Wednesday, September 25, 2013

Tutorial: Henna Card

My sister and niece recently vacationed in Myrtle Beach and came home with Henna tattoos. My niece, 16, became fascinated with them and being the artist she is, she began doodling them everywhere. I came across a henna embossing folder and knew I had to have it! But once I got it I wasn't really sure what to do with it. Here's what I came up with:
Not too bad! Let me show you how I did it- it's a really cool technique using wax paper!


This is the folder. It is by Darice and I found it at Joann Fabrics on sale for $1.99. Plus, because I belong to The American Sewing Guild I get an additional 10% off! Whoohoo!


Cut a piece of wax paper and place it in the folder. If you are using a Big Shot put it on the last folder. I tried it on the same one you would emboss paper but it ripped the wax paper.

This is what you get. It's a little crumpled but don't worry, this is a distressed card and doesn't require perfection.


Place your wax paper on a piece of cardstock.


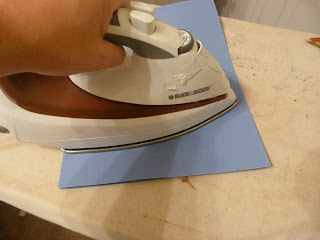
Now the risky part- something your mother would have beat you with a wooden spoon for! Place another piece of cardstock on top of the wax paper and iron it for just a few seconds.


This is what you get when you pull the paper back. The edges are just from the crumpled wax paper. This actually makes an awesome background without embossing folders! Just crumple, flatten and iron.


The image you see now is actually darker than it really is. To bring the image out I am using Distress Ink by Tim Holtz. I love his products! If you look closely on the front there is a little dot. I inked paper with all of my distress inks and then hole punched each one and attached it to the front of the pad so I can see the colors without pulling each out.
You can use the foam applicator by Ranger ( top left) or you can use a makeup sponge from your dollar store ( top right)


               Distress inks are not meant to be used the same way our normal inks are. You want to tap, tap, tap in the ink and then apply to your cardstock in a circular motion. You may have to use a little muscle when rubbing! The above photo shows the right half with ink. You can see how it really brings out the design!

Almost finished! If you see any light spots go back over them until you are satisfied!


Now cut your cardstock for the back of the paper and prepare to ink again with the distress ink.
Instead of using circles, I dabbed this one!


Color test: Remember the other sheet of cardstock you used to iron? Well use that to test your colors. One side always comes out better than the other so the less embossed side becomes my color tester! Use different inks and sparkles to see what you like best.

I chose black! I thought it really popped!

I put small dots all around the circle areas of the design!

Here's another one I did a little bigger and using blue stickles. It takes on a different look just by changing the sparkles!


If you have any questions please post them below!
My Shameless plugs:

Facebook Page   "Like" for giveaways and ideas!

Stampin Up

Etsy Shop

Tuesday, September 24, 2013

Friday, September 20, 2013

Alcohol Ink Bug??? Oh NO!

Many of you are like me, when we get a bug we just can't shake it! Well,,,,,,, I have an alcohol ink bug! I only have a few but I am in love!!! Let me show you why................
For this card I used orange and yellow alcohol inks on photo paper. Then I stamped it with an awesome sunflower stamp. Cut it out, cut a piece of burlap, embossed my background and tied a bow! How easy was that???


This card was made the same way only using purple and blue alcohol inks.

If you would like to see a tutorial on how to use alcohol inks leave a comment below and I will upload a video!


My Shameless plugs:

Facebook Page   "Like" for giveaways and ideas!

Stampin Up

Etsy Shop

Thursday, September 19, 2013

Alcohol Inks- What can they do for you?

I bought a few alcohol inks some time ago because like many things in my craft room, I had to have it! I wasn't really sure what to do with them so there they sat, lonely and full! Well, it's time to break them out! With the leaves changing and the the crisp air of fall I wanted to really feel that in a card. I am tired of stamping pumpkins and ghosts ( Ok, not really tired of it!) and I wanted something different. That's when I broke out the inks! The best part about them is that you really can't mess up!


I really like the way this came out! If you would like to see a tutorial on how this was made leave me a comment below!


And of course  my shameless plug to my Etsy Shop  and my Facebook page! Be sure to "Like" my FB page to keep up on new projects and on giveaways!

Wednesday, September 18, 2013

Fall Cards

Fall Cards

I have been making so many cards over the last few weeks. Here are some of my recent ones:
 
I fell in love with this stamp and I knew I had to have it. I colored it using my Spectrum Noir markers. Would anyone be interested in a Spectrum Noir tutorial?

 
I really needed a scrappy project. I had so many fall scraps laying around I was starting to go crazy! Using the scraps as vertical strips on these cards was perfect for them.
 
 
Do you need a scrappy fall project already?
 

And of course  my shameless plug to my Etsy Shop  and my Facebook page! Be sure to "Like" my FB page to keep up on new projects and on giveaways!

Is it Fall already???

The leaves are starting to change here in NC and I am so excited! Fall is my favorite time of year. The colors are so beautiful and the crisp air is so refreshing. This is our first fall in NC so I am hoping it is a good one. With that said, let's get move onto the fall crafting world!


What's hot in my craft room:

I have been working on fall and Halloween cards. scrapbook pages and sewing. My favorite so far is my fall (coffee) table runner. This was such an easy project. It took me a long afternoon to complete. 
Front
 
Back
 
I followed this video from The Missouri Star Quilt Company to make this. Jenny did the video as a scrap buster but I wanted mine with new fall fat quarters I had purchased at ACMoore for $1 each!! Can you believe that? If you have an ACMoore near you they have seasonal FQ's usually in a spinning display for $1 all of the time. If you get a 20% off total purchase or $5 off $20 or more then you are REALLY in for it!! That's about $.75 per FQ- who ever heard of such a thing???
 
Geez, sales get me so excited! As I was saying about the video... Jenny made hers much wider than I did. The idea is the same so you can make it any size you want. Starting in the center cut a block to whatever size you choose.  Cut your strips and apply in order, just like a log cabin. After I pieced the top of course I thought how easy it would have been to do this as a "quilt as you go" project! Oh well, next time!
 
Apply your binding and you're done!
 
I really love Missouri Star Quilt Company. I have ordered many items from their shop and the tutorials are wonderful. If you aren't subscribed to the videos you should and if you don't get their daily emails you should! The always have a great " Deal of the Day" and I have picked up many charm packs for only $2.99.  Ok, enough of the plugs! :)
 
 
On to the next craft....
 
 
And of course  my shameless plug to my Etsy Shop  and my Facebook page! Be sure to "Like" my FB page to keep up on new projects and on giveaways!