My sister and niece recently vacationed in Myrtle Beach and came home with Henna tattoos. My niece, 16, became fascinated with them and being the artist she is, she began doodling them everywhere. I came across a henna embossing folder and knew I had to have it! But once I got it I wasn't really sure what to do with it. Here's what I came up with:
Not too bad! Let me show you how I did it- it's a really cool technique using wax paper!
This is the folder. It is by Darice and I found it at Joann Fabrics on sale for $1.99. Plus, because I belong to The American Sewing Guild I get an additional 10% off! Whoohoo!
Cut a piece of wax paper and place it in the folder. If you are using a Big Shot put it on the last folder. I tried it on the same one you would emboss paper but it ripped the wax paper.
This is what you get. It's a little crumpled but don't worry, this is a distressed card and doesn't require perfection.
Place your wax paper on a piece of cardstock.
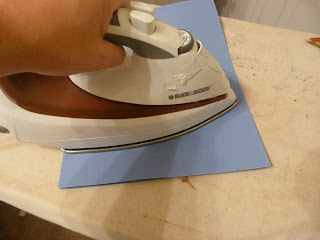
Now the risky part- something your mother would have beat you with a wooden spoon for! Place another piece of cardstock on top of the wax paper and iron it for just a few seconds.
This is what you get when you pull the paper back. The edges are just from the crumpled wax paper. This actually makes an awesome background without embossing folders! Just crumple, flatten and iron.
The image you see now is actually darker than it really is. To bring the image out I am using Distress Ink by Tim Holtz. I love his products! If you look closely on the front there is a little dot. I inked paper with all of my distress inks and then hole punched each one and attached it to the front of the pad so I can see the colors without pulling each out.
You can use the foam applicator by Ranger ( top left) or you can use a makeup sponge from your dollar store ( top right)
Distress inks are not meant to be used the same way our normal inks are. You want to tap, tap, tap in the ink and then apply to your cardstock in a circular motion. You may have to use a little muscle when rubbing! The above photo shows the right half with ink. You can see how it really brings out the design!
Almost finished! If you see any light spots go back over them until you are satisfied!
Now cut your cardstock for the back of the paper and prepare to ink again with the distress ink.
Instead of using circles, I dabbed this one!
Color test: Remember the other sheet of cardstock you used to iron? Well use that to test your colors. One side always comes out better than the other so the less embossed side becomes my color tester! Use different inks and sparkles to see what you like best.
I chose black! I thought it really popped!
I put small dots all around the circle areas of the design!
Here's another one I did a little bigger and using blue stickles. It takes on a different look just by changing the sparkles!


.jpg)
.JPG)


.jpg)


